Wednesday, December 10, 2014
Primary Color Self-Portraits
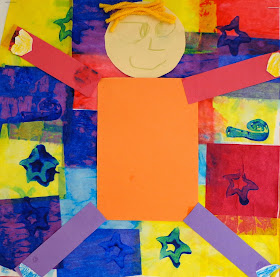
Students in grades PreK and Kinder created these self-portraits. We began by making a tissue paper collage with the three primary colors- red, yellow and blue. The squares of tissue paper were placed onto the white paper with a slight overlap so students could see how the secondary colors are made. During the next class, students used simple cut out shapes to create a self-portrait. We drew the facial features on and students could also add a drawing or design to their shirts. On the final class, we added hands and shoes and also glued yarn on for hair. The students could also add some star or swirl stamps in blue to the backgrounds. This is a great project to directly show students how to mix colors as well as teaching the vocabulary for a self-portrait.
Friday, December 5, 2014
Autumn Trees
Students in grades 4-6 created these autumn trees as an in depth study of color and value. We began by drawing out a grid in pencil and painting the shapes in a monochromatic color scheme. Students could choose one color and then create different tints and shades of that color to complete the painting. We then learned about atmospheric perspective- how in a landscape objects that are farther away become lighter and blurrier. Students then created three horizon lines and trees, the closest were dark while the ones farther away got lighter and smaller. This was a great lesson for teaching color theory- monochromatic, tints and shades as well as the concept of value and how it adds depth to an artwork.
Friday, November 14, 2014
African Animal Symbols
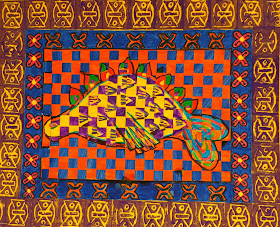
Students in grades 7 and 8 created these African animal symbols to coincide with the International Academy's global focus on West Africa. We began by reading about African art and how it is primarily made to communicate messages usually within the spirit world. Artists drew an African animal symbol on drawing paper, then traced the animal onto another sheet of paper. After the first was colored in marker, students colored in the second with the opposite or complementary color. When finished, one drawing was cut into a loom and the other drawing was cut into half inch strips. These were then woven into each other to create a contrasting color effect. The final step was to add a border of Adinkra symbols. These are symbols used in Africa to symbolize positive ideals like strength, wisdom, love, etc. This was a great in depth project that incorporates drawing, weaving, printmaking and culture.
Thursday, November 13, 2014
Textured Autumn Trees
Students in grades 1-3 created these textured autumn artworks! We began by painting the background- students first learned the three cool colors- blue, green, and purple. We then created concentric circles and painted in the design with cool colors. We then created textured rubbings and painted over the design with red and orange paint. These are common fall leaf colors and would also create a good color contrast with the sky because they are warm colors. Students painted a tree and added some textured grass for a more three-dimensional feel. This lesson covered texture, warm vs. cool colors, and also pattern.
Wednesday, November 12, 2014
Starry Night Leaves
Students in PreK and Kinder created these fun autumn paintings. We began by doing leaf rubbings with crayons on a large white paper. I also showed the students how to do a rubbing with multiple colors. These were then painted around with blue paint to give the illusion that they are falling from the trees. During the final class, students learned about Vincent van Gogh and the painting Starry Night. Students added swirling lines to create a fun sense of movement.
Tuesday, November 11, 2014
Mola Paintings
Molas are traditional designs made by the Kona people of Panama. The mola began as body painting, then after the Spanish colonized the region the Kona people learned how to add these designs to fabrics. Today, molas are applied to clothes, blankets and other types of textiles. Students made these by drawing out a large animal and decorating the inside with bright and colorful patterns. These were then painted with watercolor and decorated with different types of paper cut-out lines and shapes in the background.
Friday, October 31, 2014
Color Theory
Students in grades 7 and 8 created these symmetrical designs in various color schemes. We began by transferring a simple geometric design onto a 12 x 18' paper eight times. This created a layout that was symmetrical vertically and horizontally. Next, students chose 2-3 color schemes and filled in different sections with colored pencils. Students could choose primary, secondary, warm, cool, analogous or complementary colors. I also had the students use various techniques with the colored pencils. These included balancing the dark to light areas, blending from light to dark with one color and blending one color into another. This is a great introductory lesson to teach color and balance while giving students the opportunity to practice some different shading techniques.
Thursday, October 23, 2014
Frank Lloyd Wright Geometric Prints
Here is an article I wrote that is featured in the November 2014 issue of Arts & Activities magazine! The article is a detailed description of a middle school printmaking project in the style of architect Frank Lloyd Wright. You can also view the article at Arts & Activities website:
http://www.artsandactivities.com/
Enjoy!
Monday, October 13, 2014
Superhero Self-Portraits
Montessori students in grades 1-3 created these dynamic self-portraits. We began by drawing a realistic and proportional self-portrait. Once it was complete, we added some details to turn ourselves into superheroes- things like capes, masks, emblems, etc. Students then colored these with colored pencils and were encouraged to use bright and bold colors to mimic superheroes from comic books. We then created an abstract cityscape with oil pastels and stencils of skylines the students created. The final step was adding a moon and night sky. This was a cute twist on the self-portrait that really brought out each students personality and style.
Thursday, October 2, 2014
Watercolor Self-Portraits
Montessori students in grades 4-6 created these watercolor self-portraits as their first project for the new school year. We began by using mirrors to draw realistic and proportional self-portraits. Students were encouraged to be as observant as possible and add lots of detail. We then learned about the pop art movements in America and England. Students applied a bold and colorful outline to the portrait with colorful patterns and designs in the background. We finished by painting with watercolors- students could use the color wheel to identify analogous colors and blend them in certain areas. The colors and designs make these portraits very expressive with lots of personality!
Wednesday, October 1, 2014
Woven Crocodiles
Montessori students in grades 1-3 created these woven crocodiles as the final project for the 2013-2014 school year. We began by painting an analogous colored background. Students painted several circles and traced them repeatedly to form a pattern that would fill the page. During the second class, students cut out a crocodile and wove strips of painted paper through the body. The cool colors create a color contrast that makes the crocodiles stand out from the background. Last, we added eyes and teeth and placed some textured grass along the bottom of the painting. This is a great lesson to teach weaving, texture, and color contrast.
Tuesday, September 30, 2014
Monochromatic Self-Portraits
International Academy students created these self-portraits as their first complete project of the new school year. We began by taking selfies in class. Students then drew out a 1/2 inch grid over top of the photo. Next, we drew out a 1 and 1/2 inch grid on a 12' x 18' paper. Students then transferred the information from the photo to the paper keeping the portrait to scale and perfectly dimensional. Once complete, the students used oil pastels in one color to fill in the portrait. Oil pastels are great to blend and create different values to give the portrait more dimension. The final step was to paint in the background and add some splatter for fun. The students also learned about American artist Chuck Close who is famous for this style of portraiture.
Monday, September 29, 2014
Making Art with Shapes
Students in PreKinder and Kinder began the school year creating these artworks with shapes! Students leaned about many different shapes from the story When a Line Bends... A Shape Begins.
Students were then given some precut shapes and created many different things with them. We created suns, houses, rockets, flowers, balloons and much more. Students added and embellished these designs with crayons. Last, we cut squares and added a pattern around the border. This is a great project for the beginning of the year and introduces students to the wonderful world of shapes around them.


